
Introduction
Last week, I presented a simple example adventure for first-level Dungeons & Dragons characters. And it occurred to me that I’ve often seen players mention that there is a lack of short adventures that can be played in one (or maximum two) sessions. These short adventures are generally used to advance the characters by a single level, and can be inserted into an existing campaign—even one of the published ones—in order to get the characters to the next level for the next part of the campaign.
So I decided to write a series of short, single-level adventures that people can grab when they don’t have a lot of time and need something quick and fun to run that night. Note that is an experiment—I have no idea if I will continue through all twenty levels or not, though I will make a serious attempt to complete this project.
In writing these adventures, I’m keeping the following design guidelines in mind:
- These adventures will most likely be a series of small dungeon environments. I don’t intend any of these to be event-based.
- The encounters in the adventure will be enough to provide a single level’s worth of experience points.
- Each dungeon will have a series of encounters with various numbers and types of creatures, plus one solo creature.
- Not all the encounters will necessitate a battle—the players will usually be free to choose how to deal with the monsters within the dungeon.
- Each dungeon will include one or two traps and/or hazards, separate from the monster encounters.
- Level-appropriate treasure, rolled entirely randomly, will be included.
- I will use any creature published by Wizards of the Coast and available on DnD Beyond. I will not include stat blocks—the DM will need, at the least, the Monster Manual. I will try to suggest alternate creatures from the MM in case the DM does not have access to the book in which the creature appears or access to DnD Beyond.
- I will provide very rough maps for some—but not necessarily all—of the adventures.
- I intend to keep the word count for these adventures to about 1,500 words, and definitely below 2,000, to make it easy to read quickly and bring to the table.
I know that last week I already presented a short adventure for first-level characters. But that wasn’t part of this experiment, so I’m not going to count it. So this week I present to you the actual Dungeon #1: The Mud Caves.
Dungeon #1: The Mud Caves
- Location: This dungeon is found among some rocky outcrops at the edge of a large swamp. The swamp is surrounded by dense forest.
- Premise: A group of bullywugs have recently come into this area and established a lair. The bullywug lord wants treasure and slaves from the nearby villages, and the bullywugs have captured a pair of fishermen as well as launched a raid on one of the villages. The villagers are mostly poor, however, and so they don’t really have anything the way of treasure. The bullywug lord is angry that his bullywugs haven’t brought back anything nice from their raid, and is working up to launching a second raid against the other village.
- Hook: Last week, two of the village’s fishermen went missing. Then, a few days ago, one of the villages was raided by a band of frog-like humanoids, and two more villagers were killed. The villagers don’t know what the creatures are, but need help protecting themselves from these monstrous creatures. They approach the adventurers and beg for them to help.
- Resolution: The bullywug lord wants a place where he can establish his domain and gain treasure. He can be convinced that the villages are too poor to provide any treasure, and that taking slaves will cause him more trouble than they are worth. In this case, the bullywug will gather his people and move on—though of course this just moves the problem somewhere else. Alternately, the characters can slay all the bullywugs, thus eliminating the threat.
- Finding the Caves: If the characters search around the area where the fishermen went missing, they can find the bullywug tracks with an easy Wisdom (Survival) check. Alternately, one of the villagers can tell them about the caves that line the swamp as the best place for a monster to make its lair.
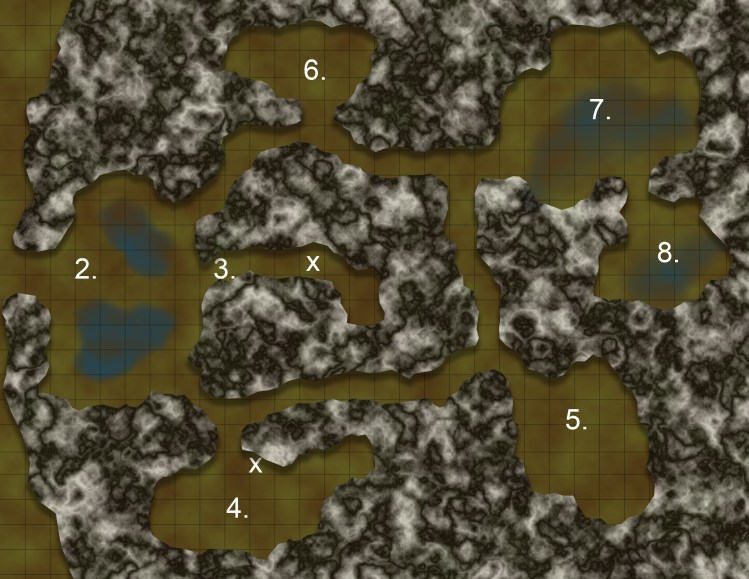
Key to the Caves
- Swamp Area: (Note that this area is not on the map, as it can be placed anywhere within the swamp.) While following the trail, or exploring the swamp area searching for the caves, the party stumbles into an area with a large, shallow pool. Five giant frogs are resting in this area. The amphibians are hungry and emerge from the water to attack the party.
Each frog continues to attack until it takes half its hit points in damage, and then it retreats from the party, at first submerging in the pool, and then leaping away farther into the swamp if the characters pursue or continue to attack.
Treasure: At the bottom of the pool is a small bag from a previous victim of the frogs—a halfling adventurer who was eaten by the amphibians—containing 141 cp, 15 sp, 8 gp, and a potion of healing.
- Watery Chamber: This chamber contains two pools of water and a muddy path between them. A hungry crocodile rests in each pool, ready to ambush anyone passing by. The bullywugs feed these crocodiles just enough so that they don’t leave to find food elsewhere. When the bullywugs need to pass by this area, they use their standing leap ability to bypass the narrow area between the pools.
The crocodiles wait in the water until one or more characters move between the pools. When a character is in range, the crocodile charges out of the water and attempts to bite him/her. If successful, the crocodile tries to pull the character back under the water (opposed STR roll to resist).
- Dead End: This passage through the rock is little more than a large crack in the stone. The bullywugs dug a 10-foot-deep pit trap at the end to cause trouble for anyone trying to infiltrate the caves.
The first PC to walk onto the square marked with the “X” on the map must make a DC 12 Dexterity saving throw or fall into the pit, taking 1d6 damage.
- Bullywug Lair: This chamber houses the five bullywugs who serve their lord. One of the bullywugs is always in the bullywug lord’s chamber, so there is never more than four bullywugs here. The walls of this chamber are a mixture of rock and mud, and are unstable. Anyone who moves into the square marked by the “X” on the map triggers a mud slide. The character must make a DC 11 Dexterity saving throw or be buried by the sudden mudslide. Once buried, the character must make a DC 15 Strength check to successfully dig their way out, and must hold their breath until they get out from the mud—failed checks can be tried each round. It takes a character outside the mud two rounds to dig the buried PC out—no check is required.
The bullywugs are cowardly—if the bullywug lord is slain and the bullywugs are aware of his death, they will attempt to flee. Otherwise, they will fight until half their number are dead, and then the remaining pair will surrender. As soon as they are given a chance, the bullywugs will attempt to flee out into the swamp to hide. If the bullywug lord is dead, any escaping bullywugs move on from this area and attempt to find another bullywug tribe to join.
Treasure: The bullywugs have kept a small amount of treasure for themselves in this chamber. If the party takes a few minutes to examine the chamber, they can find 17 cp and 45 sp scattered in the mud.
- Side Chamber: At some point in the past, a skulk was brought over from the Shadowfell, and was then abandoned. It found the bullywugs and followed them here, hoping that they would lead it to battle where it could die. The skulk stays in this chamber, out of everyone’s way, until the next raid. When it sees the characters, the skulk holds still and waits for the party to be distracted by the mud mephitis. Then, it attacks from hiding, attempting to kill as many characters as possible.
(Note that both of the fishermen that were captured as slaves by the bullywugs were murdered by the skulk within a few hours of being brought into the caves. The bullywugs have no idea who killed the fishermen or why, and the bullywug lord is suspicious that one of his bullywugs is trying to sabotage his rule. The dead bodies of the fishermen were fed to the crocodiles.)
A pair of mud mephits have also joined the bullywugs, and they often spend time with the bullywug lord, complaining and begging for treasure. Every so often, the bullywug lord gets annoyed by their constant whining, and he banishes them from his chamber. When they are not bothering the bullywug lord, they wallow in the mud pool at the western end of this chamber.
When any characters enter this room, the mephits remain motionless, waiting for the characters to fully enter. The mephits—less patient than the skulk—usually rise up out of the mud and attack first. Once the battle starts, the skulk moves into an advantageous position and attacks the characters.
- Side Chamber: This side chamber is not used by the bullywugs in order to avoid the giant constrictor snake that lives here. The snake often leaves this chamber through a hole in the rock and goes hunting in the swamp for food. When it is not hunting, it stays here in the darkness.
The snake immediately attacks anyone entering its lair in self-defense, as it is protecting a nest of eggs. The snake will fight to the death in this chamber, but will not pursue anyone who leaves the chamber. If the eggs are destroyed (if the nest takes any damage at all), the snake will fight for one more round and will then attempt to flee through the hole in the rock.
- Bullywug Lord Lair: The bullywug lord (see stat block at the end of this section) lives in this chamber. A crude throne has been fashioned out of branches and material that was stolen from the villagers. There is always one bullywug here to serve the whims of the lord—mostly making it grovel or bring it “treasures” to look at one-by-one. A crude shelf has been attached to the north wall of the chamber, and the treasures are kept on this shelf in plain view of anyone entering the room.
Treasure: Eleven 50 gp gems are kept on the shelf (3 moonstones, 2 pieces of onyx, 3 bloodstones, 1 citrine, and 2 jasper), along with a bone scroll tube with ornate carving around the top and bottom. The bullywugs have never opened the tube, and are unaware it contains a pair of spells scrolls: burning hands and cloud of daggers.
- Treasure Chamber: This chamber can only be accessed by a small hole at ground level. Any character—even a halfling—will need to crawl to get through the hole into the chamber beyond, and creatures of large size or larger are too large to move through the hole. The bullywug lord put a bag of coins and other treasure into this chamber before he realized that it is the nest of three stirges. The stirges attacked him, and he retreated, and has not been able to get back in to recover the bag. A hole in the ceiling of this chamber allows the stirges to come and go, but they spend most of their time in here when they are not out hunting for blood.
The bag sits in the middle of the chamber, half-sunk in the mud.
Treasure: The bag contains 2,142 cp, 440 sp, and 92 gp.
Creatures
Bullywug Lord
The bullywug lord is simply a tougher, stronger, and slightly more intelligent example of its species, which tends to make it possible to assume a leadership role among its people.
Medium humanoid (bullywug), neutral evil
Armor Class 14 (Hide Armor)
Hit Points 55 (10d8+10)
Speed 20 ft., swim 40 ft.
STR DEX CON INT WIS CHA
14 (+2) 12 (+1) 13 (+1) 10 (+0) 10 (+0) 8 (-1)
Skills Stealth +3
Senses passive Perception 10
Languages Bullywug
Challenge 1 (200 XP)
Amphibious. The bullywug can breathe air and water.
Speak with Frogs and Toads. The bullywug can communicate simple concepts to frogs and toads when it speaks in Bullywug.
Swamp Camouflage. The bullywug has advantage on Dexterity (Stealth) checks made to hide in swampy terrain.
Standing Leap. The bullywug’s long jump is up to 20 feet and its high jump is up to 10 feet, with or without a running start.
Actions
Multiattack. The bullywug makes two melee attacks: one with its bite and one with its spear.
Bite. Melee Weapon Attack: +4 to hit, reach 5 ft., one target. Hit: 4 (1d4 + 2) bludgeoning damage.
Spear. Melee or Ranged Weapon Attack: +4 to hit, reach 5 ft. or range 20/60 ft., one target. Hit: 5 (1d6 + 2) piercing damage, or 6 (1d8 + 2) piercing damage if used with two hands to make a melee attack.
Map
Here is a simple map of the Mud Caves:
Conclusion
I hope you enjoyed this little dungeon. Next week I tackle Level 2!

2 thoughts on “Dungeon-a-Week #1: The Mud Caves”